Editing Investigator data manually
Add a Profile Name & Job
Add the name of your Investigator next to the "Name" property.
Add the job of your Investigator next to the "Job" property. Ensure both are wrapped by the double quotes ".
E.g.
[
  {
    "Name": "John Doe",
    "Job": "Firefighter",
    "Image": "img/profile-generic-male.webp",
    "Ability": "",
    "Stats": {
      "Damage": 7,
      "Horror": 7
    },
    "Attributes": {
      "Strength": 4,
      "Agility": 3,
      "Observation": 5,
      "Lore": 3,
      "Influence": 4,
      "Will": 2
    },
    "Story": ""
  }
]
Add a Profile image
By default the profile image will use the App's generic profile images.
| Image Url | Description |
|---|---|
| img/profile-generic-male.webp | Generic Male Portrait |
| img/profile-generic-female.webp | Generic Female Portrait |
You can use your own images but you'll have to create/edit and upload/host them somewhere. There are a number of free services to host your images. Profile image sizes should be 400x480px.
Change the "Image" value to point to a default image or your hosted profile image.
E.g.
[
  {
    "Name": "John Doe",
    "Job": "Firefighter",
    "Image": "https://i.imgur.com/BtEY4cS.jpeg",
    "Ability": "",
    "Stats": {
      "Damage": 7,
      "Horror": 7
    },
    "Attributes": {
      "Strength": 4,
      "Agility": 3,
      "Observation": 5,
      "Lore": 3,
      "Influence": 4,
      "Will": 2
    },
    "Story": ""
  }
]
Add an Ability text
Add the ability text to the "Ability" property. Refer to the below table for a list of common words the App will automatically convert to the appropiate format. Remember not to make the text too long.
E.g.
[
  {
    "Name": "John Doe",
    "Job": "Firefighter",
    "Image": "img/profile-generic-male.webp",
    "Ability": "When resolving a {strength} test, you may convert any {?} to {success}",
    "Stats": {
      "Damage": 7,
      "Horror": 7
    },
    "Attributes": {
      "Strength": 4,
      "Agility": 3,
      "Observation": 5,
      "Lore": 3,
      "Influence": 4,
      "Will": 2
    },
    "Story": ""
  }
]
Ability Words
The below formats will be automatically converted by the app to the corresponding format.
| Format | Converted Format | Description |
|---|---|---|
| \n | Creates a new Line | |
| {{text}} | text | Bolds the text |
| {action} | Action: | Action text |
| {focused} | Focused | Focused condition |
| {dazed} | Dazed | Dazed condition |
| {fearless} | Fearless | Fearless condition |
| {mesmerized} | Mesmerized | Mesmerized condition |
| {poisoned} | Poisoned | Poisoned condition |
| {restrained} | Restrained | Restrained condition |
| {righteous} | Righteous | Righteous condition |
| {stressed} | Stressed | Stressed condition |
| {stunned} | Stunned | Stunned condition |
| {wounded} | Wounded | Wounded condition |
| {insane} | Insane | Insane condition |
| {strength} | Strength | Strength icon |
| {agility} | Agility | Agility icon |
| {observation} | Observation | Observation icon |
| {lore} | Lore | Lore icon |
| {influence} | Influence | Influence icon |
| {will} | Will | Will icon |
| {?} | Clue | Clue icon |
| {success} | Success | Success icon |
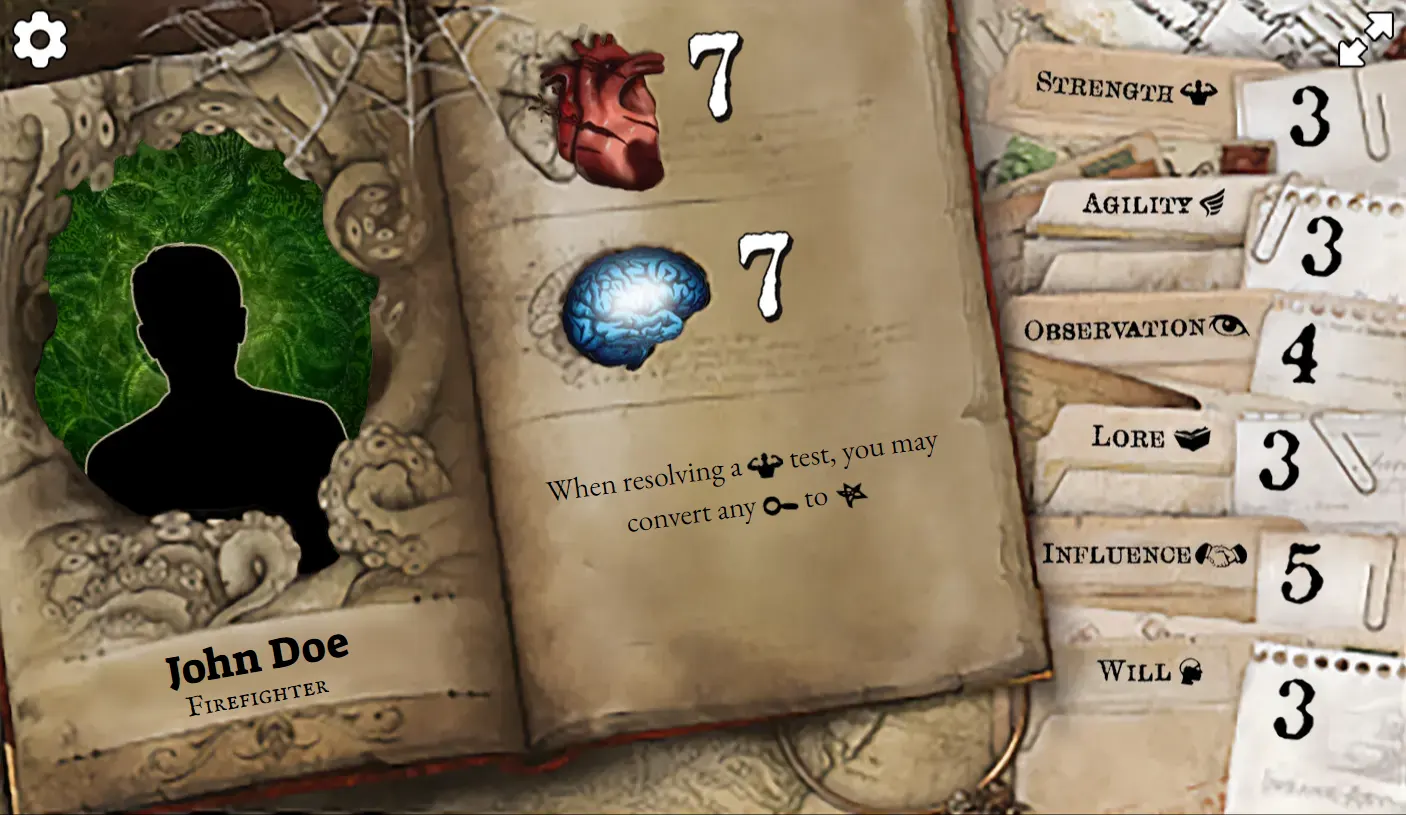
Update the character's Stats & Attributes
Update the numbers for your character's Stats and Attributes. Stats can be 1-9, Attributes can be 1-5.
Generally, Damage and Horror should add up to 14 and Attributes to 21. Keep that in mind if you are going for balanced Investigators, otherwise numbers are up to you.
[
  {
    "Name": "John Doe",
    "Job": "Firefighter",
    "Image": "img/profile-generic-male.webp",
    "Ability": "When resolving a {strength} test, you may convert any {?} to {success}",
    "Stats": {
      "Damage": 7,
      "Horror": 7
    },
    "Attributes": {
      "Strength": 3,
      "Agility": 3,
      "Observation": 4,
      "Lore": 3,
      "Influence": 5,
      "Will": 3
    },
    "Story": ""
  }
]
Add a story to your Investigator
Add the story text to the "Story" property. Refer to the below table for formatting used by the Web App.
[
  {
    "Name": "John Doe",
    "Job": "Firefighter",
    "Image": "img/profile-generic-male.webp",
    "Ability": "When resolving a {strength} test, you may convert any {?} to {success}",
    "Stats": {
      "Damage": 7,
      "Horror": 7
    },
    "Attributes": {
      "Strength": 3,
      "Agility": 3,
      "Observation": 4,
      "Lore": 3,
      "Influence": 5,
      "Will": 3
    },
    "Story": "[Some dramatic story quote here]\n\nSome story about John Doe's character as a Firefighter and why this character is who he is."
  }
]
Story Formatting
The below formats will be automatically converted by the app to the corresponding format.
| Format | Converted Format | Description |
|---|---|---|
| \n\n | Used to separate paragraphs | |
| {text} | "text" | Used to create a quote |
| [text] | text | Used to bold text |
Add multiple Investigators
Multiple Investigators can be added by copying and pasting the {} block and appending it to the previous Investigator, separated by a comma ",". Make sure there is no comma on the last added Investigator otherwise the Web App may not be able to read the data.
E.g.
[
  {
    "Name": "John Doe",
    "Job": "Firefighter",
    "Image": "img/profile-generic-male.webp",
    "Ability": "When resolving a {strength} test, you may convert any {?} to {success}",
    "Stats": {
      "Damage": 7,
      "Horror": 7
    },
    "Attributes": {
      "Strength": 3,
      "Agility": 3,
      "Observation": 4,
      "Lore": 3,
      "Influence": 5,
      "Will": 3
    },
    "Story": "{Some dramatic story quote here}\n\nSome story about John Doe's character as a Firefighter and why this character is who he is."
  },
  {
    "Name": "Jane Doe",
    "Job": "Freelance Journalist",
    "Image": "img/profile-generic-female.webp",
    "Ability": "Cannot be {restrained} or {stunned}.",
    "Stats": {
      "Damage": 9,
      "Horror": 5
    },
    "Attributes": {
      "Strength": 5,
      "Agility": 3,
      "Observation": 2,
      "Lore": 3,
      "Influence": 5,
      "Will": 3
    },
    "Story": "{Some dramatic story quote here}\n\nSome story about Jane Doe's character as a Freelance Journalist and why this character is who she is."
  }

]
Check your datasource file is correct
You can check that your datasource file is correct by copy and pasting it into jsonlint.com. This will ensure that file is formatted correctly and will work with the app.
Wrap-up and afterthoughts
Once you have created your datasource file, you'll need to upload/host it somewhere. Refer to the info page for further details. Once hosted, you can copy and paste your datasource link into the app to view your custom Investigators.