Overview
This web app was originally designed to bring a new range of unique and more balanced custom Investigators to play with Mansions of Madness: 2nd Edition. When playing, select an existing Investigator in the official MoM:2e app and substitute the character with one from this web app or your very own custom one (see below for more details). This app is free to use and designed to be viewed on mobile.
Update 19/10/2025 - Released Custom Investigator Creator Tool and updated guide.
Update 11/10/2025 - Updated artwork for custom Investigators and home screen.
Update 23/08/2021 - The app has been updated to include all the original Investigators from the base game and expansions, in addition to the custom Investigators (for those that have lost their physical cards or want to view/play with Investigators from the hard to find expansions!).
Creating your own Investigators
Custom Investigator Creator Tool
You can now create and customize your own Investigators to use with the Web App by using the Custom Investigator Creator Tool.
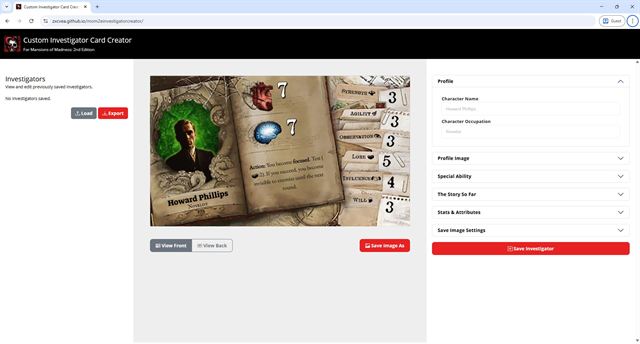
Once you have created your investigators with this tool, you will need to Export the JSON file and host it somewhere for the Web App to read (Refer to Step Three below).
Manually creating a data file
Prior to the release of Custom Investigator Creator Tool, this was the original method of getting your custom investigators to work with the App. I've left these instructions in so you can understand how the data in the JSON file works. I highly recommend using the Custom Investigator Creator Tool above instead.
Step One: Create a datasource file
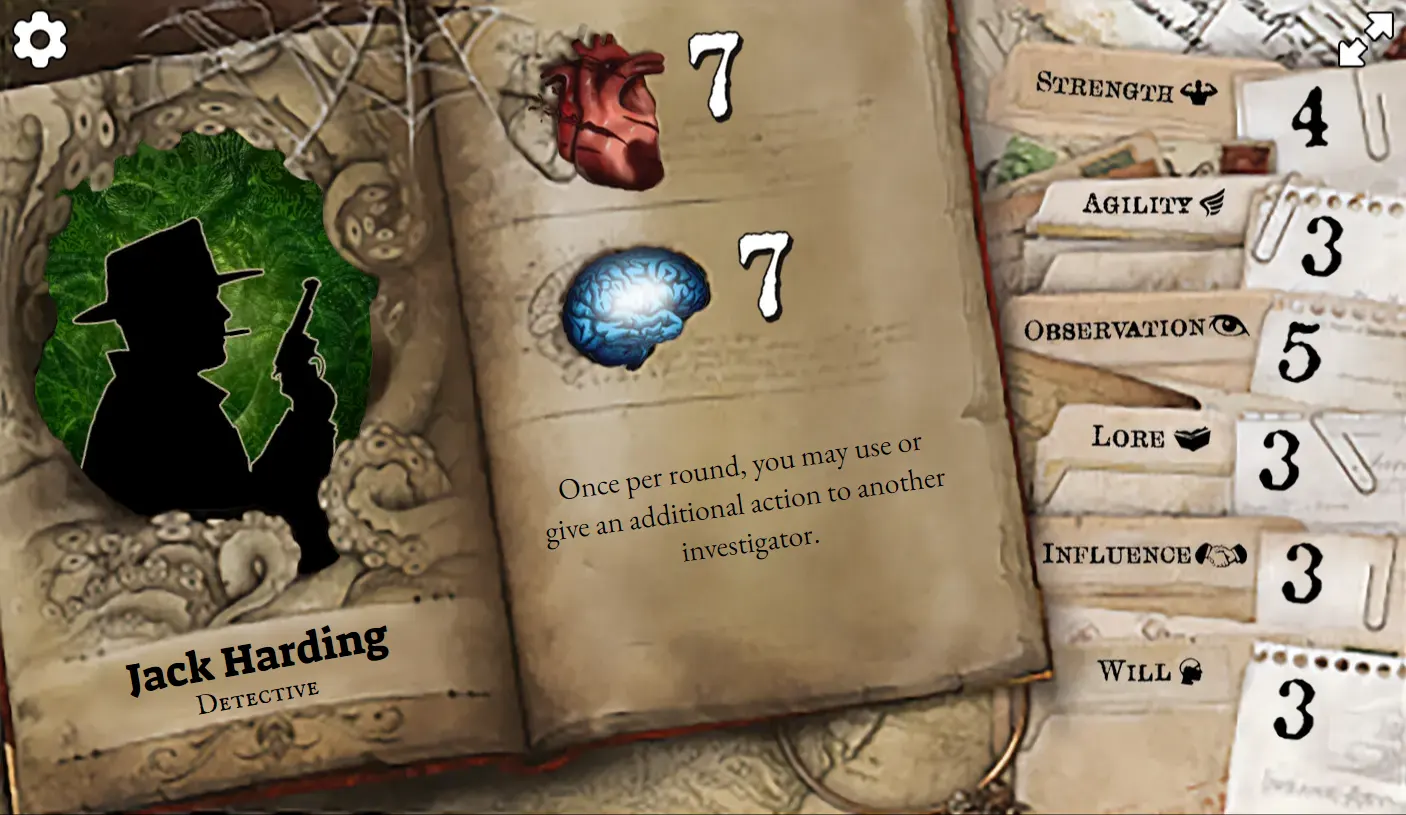
The datasource file is where the custom Investigator data is kept. It contains all the information, as well as the stats, abilities and attributes.
Start by creating an empty JSON file - customdata.json or download the example file: customdata.json
Copy and paste the Investigator data template from below (if creating a new file) into the newly created file or edit the example file.
[
  {
    "Name": "",
    "Job": "",
    "Image": "img/profile-generic-male.webp",
    "Ability": "",
    "Stats": {
      "Damage": 7,
      "Horror": 7
    },
    "Attributes": {
      "Strength": 4,
      "Agility": 3,
      "Observation": 5,
      "Lore": 3,
      "Influence": 4,
      "Will": 2
    },
    "Story": ""
  }
]
You can download and view the default preset data used by the Web App here: investigators-custom.json
Step Two: Edit and Add Investigators to your custom datasource file
Edit the Investigator data by adding in the profile data as well as the starting Stats and Attribute numbers. Refer to the below guide for more information.
Step Three: Upload/host your custom datasource file and images
Hosting datasource file
In order for the Web App to be able to read and use your datasource file, you'll need to upload and host it somewhere. Dropbox is recommended.
Note: You could use other services but the Web App needs to be able to read the raw file so services like Google Drive or OneDrive won't work.
Hosting profile images
Any custom profile images can be uploaded to/hosted on any Image hosting service. A few examples of image hosting services below:
Step Four: Using your custom datasource file with the Web App
Now that you've got your custom datasource file hosted somewhere, you can copy and paste the url of the link into the Settings (cog icon) of the Web App and hit update. It should automatically update the Web App with your custom Investigator data.

Step Five: Share your custom Investigators
Share the link to the Web App (https://zxcvea.github.io/mom2einvestigators) and a link to your datasource file. Get them to follow the above steps in Using your custom datasource file with the Web App.
Special Thanks
- MintyFreshPrince - Play Tester & Investigator Extraordinaire
- RedWolf - Providing Valkyrie Content Creation Kit assets